![sudo[freedom].org](https://sudofreedom.org/content/images/2025/08/sudo.png)
How to Rescue a Failing Hard Drive with Linux: A Real Recovery Story
![sudo[freedom]](/content/images/size/w160/2025/08/square.svg)
Your hard drive is dying. You can hear it clicking, grinding, or maybe it just disappeared from your system. Windows users at this point usually panic, call a data recovery service, and pay hundreds or thousands of dollars. Or they accept the loss.
Linux users have another option. A better one. A free one.
This is the story of how we used ddrescue, a powerful Linux command-line tool, to recover 99.98% of data from a heavily damaged 150 GB external hard drive. No expensive software. No data recovery company. Just Linux, a terminal, and a bit of patience.
Why This Matters
Data recovery is one of those moments where digital freedom becomes intensely personal. When your drive fails, you should not have to choose between losing everything or paying a fortune to a proprietary service.
Linux gives you the tools to rescue your own data. Tools that are transparent, reliable, and completely under your control. You own your computer. You should own your recovery process too.
What Is ddrescue?
ddrescue (GNU ddrescue, not the older dd_rescue) is a data recovery tool designed specifically for failing drives. Unlike basic disk copying tools, ddrescue is intelligent about how it handles damaged sectors.
How it works:
ddrescue makes multiple passes over your drive. First, it copies all the good sectors quickly. Then it goes back and carefully attempts to read the damaged areas, using different strategies to maximize recovery. It logs everything it does, so if your source drive dies mid-recovery, you can resume exactly where you left off.
The tool is completely free, open source, and included in most Linux distributions.
The Real Recovery: What We Did
Here is the actual process we used to recover a dying 150 GB hard drive.
Step 1: Install ddrescue
On Ubuntu, Linux Mint, or Debian-based systems:
sudo apt updateThe package is called gddrescue (GNU ddrescue) to distinguish it from the older dd_rescue tool.
Step 2: Identify Your Drives
Before you start, you need to know which drive is which. Use lsblk to list all connected drives:
lsblkIn our case:
- Source drive (failing):
/dev/sda - Destination (external USB drive):
/media/USER/FOLDER/
Critical warning: Get this right. ddrescue will overwrite the destination. If you mix up source and destination, you will destroy your data.
Step 3: Run ddrescue
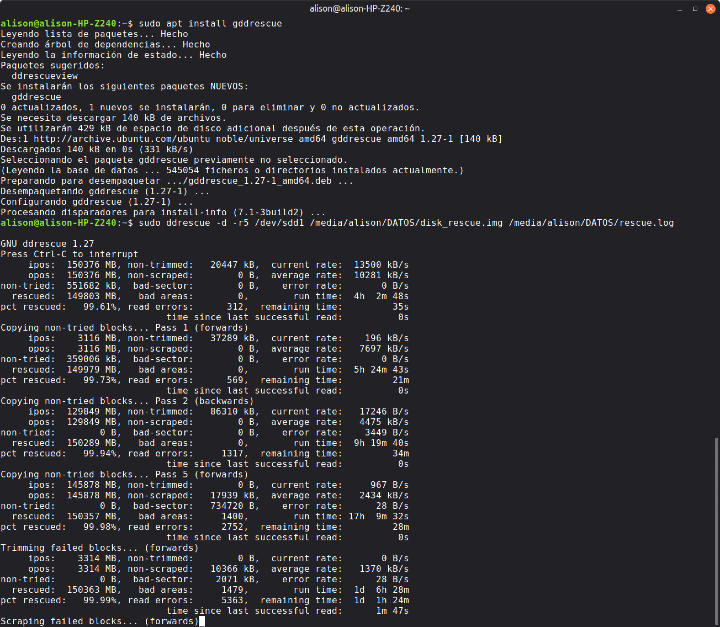
We ran ddrescue with the following command:
sudo ddrescue -d -r5 /dev/sda /media/What each part means:
sudo- Required for direct disk accessddrescue- The recovery program-d- Use direct disk access (bypass caching)-r5- Retry bad sectors up to 5 times/dev/sda- Source drive (the failing one)/media/USER/FOLDER/disk_rescue.img- Output file (the recovered image)/media/USER/FOLDER/rescue.log- Log file (tracks progress)
The log file is essential. If the recovery gets interrupted, you can resume by running the exact same command. ddrescue will read the log and continue from where it stopped.
Step 4: Wait (and Monitor)
ddrescue runs in three phases:
Phase 1: Initial copy It quickly reads all the good sectors. This phase moves fast.
Phase 2: Trimming It attempts to define the exact boundaries of bad sectors.
Phase 3: Scraping It tries multiple read strategies on the worst sectors. This phase is slow and can take hours or even days for heavily damaged drives.
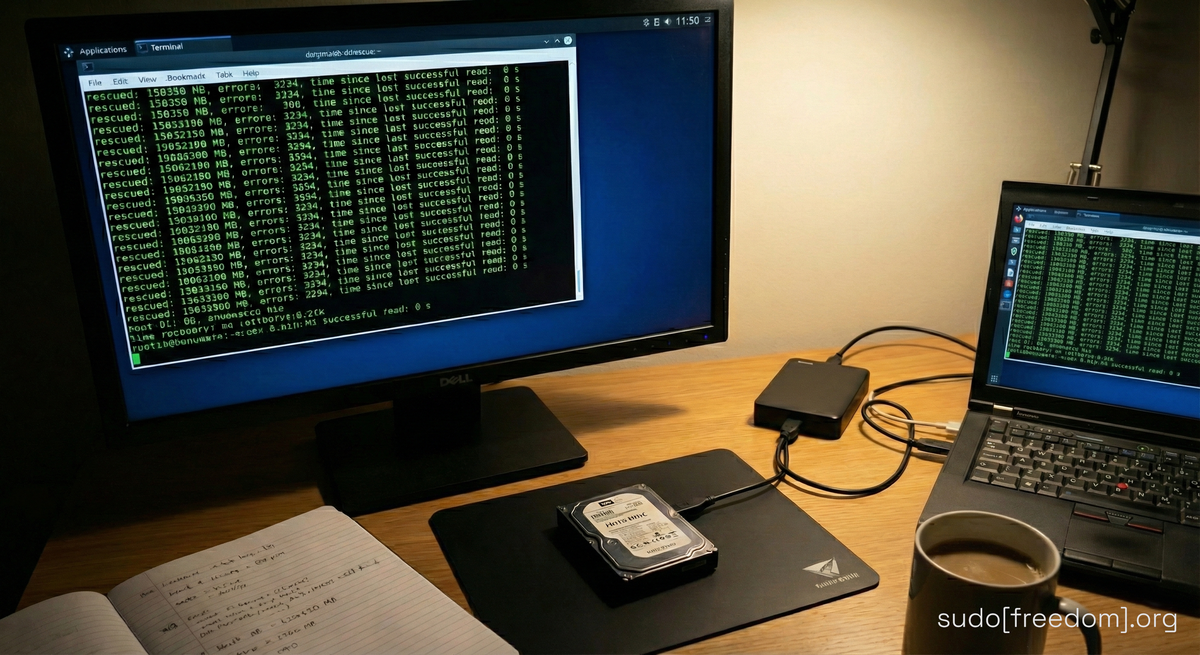
In our recovery, we saw:
- 99.61% recovered after the first pass
- 99.73% after trimming
- 99.98% after scraping began
- Final result: 150,350 MB recovered out of ~150 GB
- 3,234 read errors
- 1,309 bad areas
- Estimated time remaining: 9 days 10 hours (for the final 0.02%)
Step 5: Decide When to Stop
At 99.98% recovery, we faced a choice. Let it run for potentially 9 more days to recover the final 0.02%, or accept what we had.
Here is the key thing most people do not realize: the image file is already safe. ddrescue writes recovered data directly to the output file as it works. That 99.98% was already saved. If the source drive died at that moment, the image would still be perfectly usable.
We stopped the recovery. The remaining 0.02% represented the most damaged sectors on the drive. The critical data was already safe.
To stop ddrescue safely, press Ctrl+C. The log file ensures you can resume later if needed.
Step 6: Access Your Recovered Data
The output file disk_rescue.img is a complete disk image. You can mount it just like a real drive:
sudo mkdir /mnt/recoveryThe ro flag mounts it read-only, protecting the image from accidental changes.
Now you can browse your recovered files, copy what you need, and verify everything worked.
When finished:
sudo umount /mnt/recoveryWhat Makes ddrescue Different
Proprietary data recovery tools cost hundreds of dollars and run only on Windows. They hide how they work. They lock you into subscription models. Some even charge per gigabyte recovered.
ddrescue is free, open source, and arguably more capable. It handles bad sectors intelligently, logs everything, and gives you complete control.
More importantly, you learn something. You gain skills. You understand what is happening to your drive and your data. That knowledge stays with you.
Hardware Recommendations
For the source drive: Connect it directly via SATA if possible. USB adapters work but add another point of potential failure.
For the destination: Use a drive at least as large as the source. External USB drives work fine. Make sure it has enough free space for the entire image plus the log file.
For the recovery system: Any Linux installation will work. A live USB of Linux Mint or Ubuntu is perfect if you do not want to install Linux.
When to Use a Professional Service
ddrescue is powerful, but it is not magic. If your drive has physical damage (broken platters, failed motors, damaged read heads), you need a professional clean room recovery service.
Signs that professional help is needed:
- Drive does not spin up at all
- Loud grinding or scraping noises (not just clicking)
- Visible physical damage
- Drive not detected by BIOS/UEFI
- Data is worth more than professional recovery costs
For everything else, ddrescue gives you an excellent chance of recovery.
The Bigger Picture
This is what digital freedom looks like in practice. Not abstract philosophy. Actual tools that work, that you control, that save your data when proprietary systems would leave you helpless.
You do not need to be a Linux expert to use ddrescue. You need basic command-line comfort and careful attention to which drive is which. The rest is just patience.
Your data belongs to you. The tools to protect it should too.
Quick Reference Command
Here is the basic ddrescue command pattern:
sudo ddrescue -d -r3 /dev/SOURCE /path/to/output.img /path/to/logfile.logReplace:
/dev/SOURCEwith your failing drive/path/to/output.imgwith where you want the image saved/path/to/logfile.logwith where to save the recovery log-r3with how many retry passes you want (3-5 is typical)
Always keep the source and log file on different physical drives from the destination.
Want to Learn More?
Data recovery is just one small example of what Linux puts in your hands. No subscriptions. No vendor lock-in. No artificial limitations.
If you are tired of being told what you can and cannot do with your own computer, Linux might be exactly what you need.
Resources
Official Documentation:
- GNU ddrescue Manual - Complete official documentation
- ddrescue Wikipedia Page - Overview and comparison with other tools
Tutorials and Guides:
- Ubuntu ddrescue Guide - Community-maintained walkthrough
- ArchWiki Data Recovery - Comprehensive recovery guide covering multiple tools
Related Linux Recovery Tools:
- TestDisk - Partition recovery and repair
- PhotoRec - File recovery by file type (works on all file systems)
- Safecopy - Alternative data recovery tool
- ddrutility - GUI wrapper for ddrescue
Community Support:
- r/linuxquestions - Active Linux community for troubleshooting
- Linux Mint Forums - Helpful community for Mint-specific questions
- Ask Ubuntu - Stack Exchange site for Ubuntu and derivatives
Hardware Diagnostics:
- smartmontools - Monitor drive health with SMART data
- GSmartControl - GUI for smartmontools
When You Need Professional Help:
- Look for local data recovery services with clean room facilities
- Ask about their success rate with your specific failure type
- Get quotes from multiple providers
- Verify they work with Linux file systems (ext4, btrfs, etc.)